Everyday we face repetitive tasks in our design process that take time. We normally don’t pay attention to them, but if you look closely they add up quite a bit of time.
Do you know how to save time in some of them? Have you though if the way you do them is the quickest way? have you tried a different tool? Stop losing your time and learn my tricks for crop images quickly, resize a picture easily, adjust the colors of a picture and optimize them to make the pictures lighter!
1- Crop a picture in five seconds
While you open Photoshop, wait for it to load, open the image and get the crop tool I already croped, saved and left the room for a coffee. But.. how? The answer is easy: Preview app! It is my secret weapon.
Oh, yeah, right… but how do you do it so quick!? And here comes the second trick: keyboard shortcuts! Specifically four of them:
-
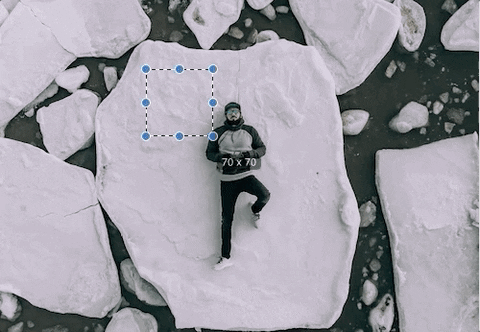
Select is just click and drag (you can select a square holding
SHIFT) -
Once selected you crop using
cmd + k -
Then save with
cmd + s -
And you close the window with
cmd + w
Easy! Right? Select, crop, save, and close!
2.- Change size to a picture
How to make an image perfectly sized for instagram? 1080x1080px? Easy!
You can also use Preview! There are two ways of doing it:
Select a square of exactly that dimensions pressing shift while you click and drag (until you see 1080px) and then cmd + k for cropping.
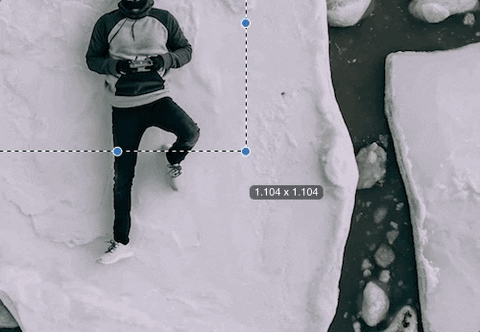 Remember:
 shift and drag, and then cmd + k
Or you can follow these steps that will make you quicker and more precise!
You have to first make the width of the image the size you want by using Tools > Adjust Size and then set the width to 1080px (make sure “rescale proportionally” is checked). I also recommend to go to 72ppi so the image is lighter and better for its use online.

Quick trick here:
-
cmd + "+"ocmd + “-”for zooming in or out. -
cmd + 0for seeing the picture in real size. -
cmd + 9to adjust the picture to the window. So you see the entire picture.
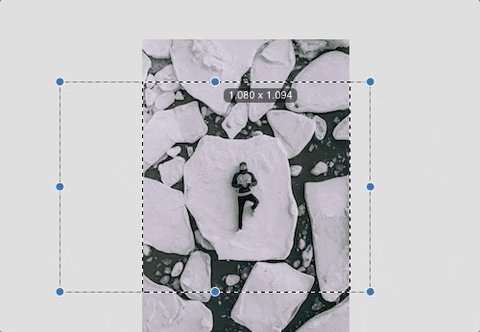
Now you just need to select full width and make sure that the height of the selection is 1080px. This is way easier than trying to match 1080x1080px in one selection. You can move the selection up and down and then just the magic trick: crop, save, and close!
cmd + k then cmd + s and then cmd + w
Pro tip: You can also batch the image adjust size feature in Preview! Wait …. What!!? Yes! Here is how.
To adjust the size of multiple images let’s say to the same width you just need to do the following:
Open all of them with Preview, select all of them from the thumbnail list on the left, and then just go to Tools > Adjust Size and follow the same steps!
Caution! Sometimes it is a heavy job for your laptop, so I recommend to take it easy and go with a few. It depends on the specs of your laptop and the size of the pictures.
And of course the order of these tools will help you get the results you are looking for. The rule of thumb is always decrease the size of the images. Adjusting the size is never useful for increasing the size, that is a magic trick I will explain in another post hehe.
3.- Remove the background of a picture
Sometimes we need to remove the background from a logo. I am talking about white (flat color) backgrounds. So how do I remove the background from a logo? How can I get the background to be transparent? How can I select the background of an image easily? That can be done with… Preview App also! There is a magic selection tool hidden in there called “instant alpha”!
First you need to open the markup panel para to see the tools.
Then you select the tool and click in the background area and drag slowly. You will see how this pink selection is propagating from the point you selected. It makes a “color selection”. The more you drag out of the point, the more it propagates. But be careful! If you drag too much it will select everything, including the logo! We want to select the background area only.
Once you have selected enough background (no need to select all of it) you can just hit delete or backspace and it will remove it! Preview will probably prompt a window asking for you to confirm you want to change the file format to png, because you need it so it gets the alpha (transparent) channel.
Then you can repeat this step again selecting another area. For example then you have letters the interior part usually is not selected, so you can select only that and remove it in the same way.
And that is how you just remove the background easily, and without using any advanced edition tool. Now you can place the logo over a texture or something else and get a good result.
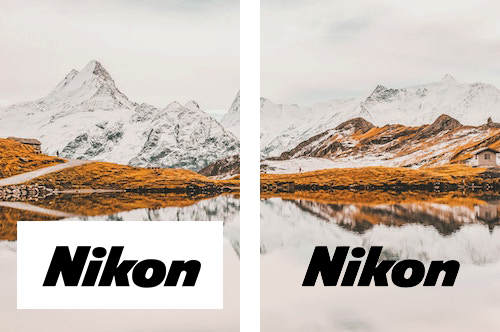
4.- Adjust the color of a picture easily in 5 seconds
Add some saturation? Adjust the levels of the picture? Add or remove some brightness? Adjust the contrast? Even some Sepia, tint, highlight or shadows… All of that can be done also with Preview app! (with some limitations)
This time go to Tools > Adjust Color or hit alt + cmd + c and you will get the super intuitive panel to adjust all of that. This is a great tool to learn how all these can affect a picture. A basic and generic recommendation would be:
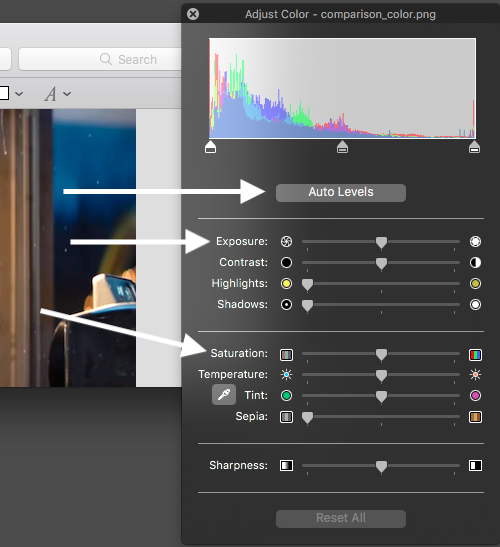
Click “Auto Levels” and then add a little bit of saturation (just a bit, don’t go crazy!).
Of course it all depends on how the picture was taken, the quality and a huge amount of complex things. But for a lot of daily tasks you just need to pop the colors a bit and get a decent image, and this is by far the quickest way to do it. And if you combine it with the clopping tricks, you are up and running in a minute!
5.- Optimize an image without losing quality
Ok, this time is not only Preview App. With preview you can adjust the size and reduce the ppi to 72 if it is going to be used on the web. But the picture still has a lot of extra information inside that weights some extra kb that probably won’t be used! How do we get rid of it? ImageOptim App!
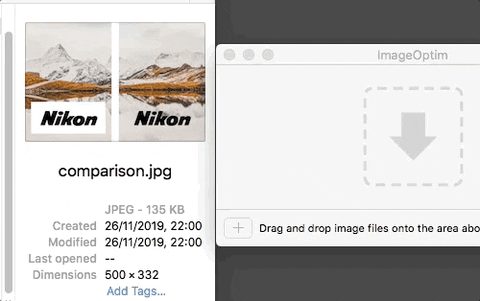
Once you have your final piece, make a copy of it, and then drag it to the app window. It will optimize it and replace in the same place. The optimization level depends on some complex stuff, and ImageOptim takes care of it so you don’t even need to understand it to take advantage of it.
The best? It is a free software and open source. You can download it here.
Do you know a better way of doing these tasks? I would love to know! Share it in the comments, don’t be shy!